


As part of my research fellowship, I held a workshop on “The Garden and Territorial Sovereignty in British Colonial India” at the British Library in collaboration with Malini Roy (Visual Arts Curator, British Library) and Leslie Topp (Director of the Architectural Space and Society Centre at Birkbeck). The workshop looked specifically at a set of maps, plans, photographs and drawings held in the Library’s collection. This blog focuses on the Mutiny Scroll, a set of panel paintings featuring buildings and monuments in Delhi, Cawnpore (now Kanpur), Lucknow, Benares (now Varanasi), Agra, and Amritsar, connected with the Indian Mutiny, in some cases from original drawings or photographs (BL Add Ms 37153).
Twenty-six panels, one scroll: depictions of events from the Sepoy Mutiny arranged to produce a continuous narrative of conflict, victory, and loss. The panels comprising the scroll are made of pieces of calico, approximately 2 ft x 3 ft, painted individually and at a later time machine-stitched to produce a vertical scroll arrangement. The artist is Dorothy Moore, wife of the Reverend Thomas Moore.
The unusual format and style of the scroll, as well as its total length, 53 ft 1 inch – the height of a five-story building – presents a number of questions. What motivated this exceptional investment of labour? How was this mutiny scroll meant to be viewed and seen? The scroll cannot be unrolled to its full length on any reasonably sized table, including any at the British Library reading rooms, and could not have been vertically unfurled in any of the churches in which the Reverend Moore served as chaplain. And finally, what do we make of the sequence of events presented in the scroll?

The Sepoy Mutiny or Sepoy Rebellion (1857-’59) began as a mutiny of Indian sepoys or soldiers of the British East India Company in military cantonments in eastern and northern India. It soon acquired the character of a popular rebellion against British rule, involving not just the soldiers but the peasantry, townspeople, and several princely states that had been annexed by the East India Company in the preceding decades.
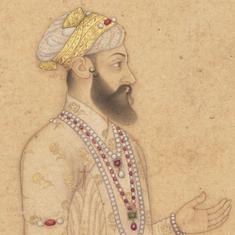
The rebels turned to the Mughal emperor, Bahadur Shah II, as their leader in a failed bid to reassert the lost sovereignty of the Mughal state. While the principal battles had concluded by 1858, and the major cities – Delhi, Cawnpore, Lucknow – had been recaptured by the British, the suppression of rebellion in the countryside continued until July 1859. The conflict entailed brutal killings on both sides, involving both military personnel and civilian populations, and accompanied by massive destruction of towns, farmlands and villages.
Memories of the mutiny
A large number of mutiny images – sketches, paintings, photographs, engravings – intended for European audiences circulated in popular print media from the beginning of hostilities in 1857. By the 1860s, key mutiny sites, considered important for their commemorative value from the British perspective, had become European tourist destinations. Thus the sites presented in the scroll would have been familiar to a European audience. The painting style and composition of the scroll, however are exceptional in expressing the artist’s personal stake in this labour of remembering the mutiny.
The watercolor and oil paintings look amateurish and theatrical. At the same time, the images, framed with texts, express a commitment to accuracy that shores up their didactic intent. Most of the panels cite the original source – the sketch or photograph taken “on the spot” – claiming a kind of documentary validity.
That many of these original images such as Felice Beato’s photographs were themselves produced after the fact, did not seem to detract from their value from the creators’ point of view. On the contrary, the re-citation of older imagery of the mutiny, three decades after the conflict, seems to have been an important element in the commemorative function of the scroll. A new authenticity is garnered by lodging the artist and her husband’s experience of the sites within the established representational order of the mutiny.
Thomas Moore (1826-1903) arrived in India in 1852 as a missionary, and sought employment with the East India Company in the hopes of financial stability. He married Dorothy Dealtry (1835-1920) in 1855 and when the mutiny broke out they were living in Calcutta with a small child. Thomas had hoped for an appointment in a relatively quiet corner of the North-Western Provinces, but his first posting as Assistant Chaplain landed him at the center of the conflict: Cawnpore.
He arrived in Cawnpore, via Benares, shortly after the British army had retaken the city after General Wheeler’s disastrous defeat at the hands of the rebels and the massacre of European women and children that had followed. Dorothy was permitted to join her husband in Cawnpore in 1858, and during the rest of his career with the East India Company until his retirement in 1879, the couple acquired first-hand experience of several mutiny sites besides Cawnpore: in Lucknow, Benares, and Jhansi.
The mutiny scroll is part of a larger production of mutiny documents by the Moores. This includes two commemorative mutiny maps of Cawnpore and Lucknow, a drawing of a model of the Lucknow Residency (Add MS 37152 A-C), and the Reverend Moore’s diary (Add MS 37153). The similarity in representational techniques between the maps and the scroll suggests that these works were a collaborative venture of Dorothy and Thomas. Thomas’s diary as well as the letters to his family lend clues to understand the scroll. During his initial arrival and stay in Cawnpore he wrote about sketching the sites associated with the mutiny, producing architectural plans, and collecting objects and materials from battle sites in anticipation of their future importance as commemorative objects and documents. Some of these sketches were later collated in his diary.
The sequence of the panels is suggestive. The scroll begins with a painting of Delhi, followed by sites at Cawnpore, Lucknow, and Benares, and concludes with locations that had scant connection with the rebellion: Taj Mahal at Agra and Golden Temple at Amritsar. The Cawnpore images are clustered in two places, before and after the 13 images of Lucknow that constitute half the scroll. It is not easy to ascertain the chronology of when the panels were painted. However, the large number of images, the process by which they have been assembled, and the reworking of initial drawings and addition of elements as afterthoughts, suggest work over a considerable period of time. Remains of brown backing on some of the Lucknow panels and pin-marks on others indicate that the panels were variously used and mounted. But the artists seem to have anticipated the images being arranged as a scroll.

Victorious tone
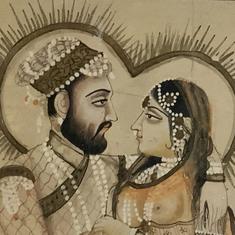
The first panel depicting Delhi, takes the Jumma Musjid and its surroundings, as the representative of “Delhi: Capital City of the Great Mogul.” The awkwardness of the perspective view and shadows within a flat composition, produces the effect of an amateur theatre “backdrop,” an aesthetic replicated in the remaining panels. Here the Jumma Musjid or congregational mosque, rather than the Red Fort in Delhi, stands in for the vanquished sovereignty of the Mughal Empire, giving the conflict a primarily religious reading.
A paper portrait medallion of Lord Canning, the Governor General of the East India Company during the mutiny, has been pasted in the center, above the panel title, representing the victor. The texts on either side of the medallion convey the panel’s message and set the tone for the rest of the scroll. On the left we have a few details of the city and its monuments that would have been of interest to a British audience, and on the right an abridged history of British ascendancy and takeover of Delhi. The narrative thus commences in 1803 (when the Mughal emperor sought the East India Company’s military assistance in warding off the Maratha invasion and effectively became a pensioner of the Company) and concludes with the British storming and capture of Delhi on September 20, 1857.
Words inscribed in all capital letters – BRITISH, WALLS, CHRISTIAN, SLAUGHTERED, SIEGE, STORMED, CAPTURED – shout out a self-evident justificatory logic. Such texts with military details appear in the rest of the images as well. Following the practice of military maps of the time, the strength of the army in terms of personnel and armament are detailed, and some of the latter panels contain small plans depicting entrenchments and armed positions of the belligerents. The panels are organised not in a chronological sequence, but according to a personal logic of what was important to the couple. We find Thomas writing to his mother: “I shall tell you . . . what I have seen tho not in the exact order of time, but as I think they deserve in importance” (Mss Eur/F630/2).
Different narratives
Of the images of Cawnpore, two deal with the locations where the European women and children were killed: the “Slaughter House,” and the well into which their bodies were thrown. The “Slaughter House” or Bibighar as it was previously known, was one of the frequently painted subjects intended to convey the depravity of the rebels. The building was demolished soon after the British recapture of Cawnpore but a sketch on site by Lt CW Crump served as a template for dozens of renditions. The scroll image is one of the most conventional of the lot, and attempts to stay true to the original sketch, and as Thomas claimed, also true to the events.

While other popular depictions of the site show a red floor representing spilled blood, bloody handprints, and texts beseeching revenge (see for example British Library, WD132 and WD4320), the scroll image eschews such references. Thomas noted in a letter to his mother that writings on the wall (“countrymen revenge”) were scribbled not by the women, but by British soldiers. The fear and anxiety suffered by the women is represented in the panel by a “COPY of MEMO” by Miss Lindsay, found on the site, in which she recorded the deaths of her family and friends before she too was killed. The panel attempts to portray the site as Thomas saw it on his arrival: scattered remnants of garments, paper, and earthen utensils, the floor dark in places with blood stains.
In wishing to memorialise the moment of Thomas’s own encounter with the site as one yet uncontaminated by marks of revenge, the artist erases other representations of force. British soldiers under General Neill’s command forced captured rebels to lick the blood of the victims before they were tortured and put to death, in a manner “altogether not very creditable to the English character” (Mss Eur/F630/2). Similarly, the image of the well shows no evidence of blood or dead bodies; the smallness of the well head even works counter to the affect intended in the title of the image.
The utter ordinariness of the well is rendered significant by framing it with the partially demolished Bibighar behind it, and the Assembly Building and Christ Church in the distance. The gallows in the middle ground attests to the punishment meted out to the rebels within sight of the two spaces of slaughter.
In the latter part of the scroll we find a depiction of Christ Church in Cawnpore as it was decked out for Christmas celebrations in 1857. When Thomas arrived in Cawnpore he found the church severely damaged by the rebel forces. The roof of the nave as well as the doors and windows had burnt down, though the church walls had held. He procured an order to have the church re-roofed in October of that year, but as the panel notes, it was again burnt down by the “Gwalior Rebels.” So Christmas service was held under a fabric canopy hung from a hastily constructed thatch roof. Thomas wrote to Dorothy: “the natives were astonished to see between 700-800 Europeans assembled in the very church they have burned twice and the moral effect is great – the Bell now rings for service as of old & Xtinity it is felt must and will triumph” (Mss Eur/F630/2). The image of the church interior contains figures of European officers in the foreground, drawn on paper and pasted onto the painting, and one of the figures is of the chaplain himself. The figures look out towards the viewer.

The mutiny scroll thus escapes the realm of historical narration and enters the domain of the personal and (auto)biographical. By locating themselves in the mutiny landscape, and by recording the landscape as they wished to remember it, edited and framed, Dorothy and Thomas mark their role as witnesses to the mutiny. In an edifying gesture, the scroll as it unfolds asks the viewer to make connections among the scattered sites of the mutiny, and to recognise the labour entailed in assembling from historical fragments a narrative of superior British military force and Christian redemption. It urges the viewer to become witness to the unfolding empire.
Professor Swati Chattopadhyay is an architect and architectural historian specialising in modern architecture and urbanism, and the cultural landscape of British colonialism. She teaches at University of California at Santa Barbara. From March-May 2017, she held a Visiting Research Fellowship at Birkbeck, University of London
This article first appeared on the British Library’s Asian and African Studies blog.